
Want to learn how to start an online course business? Willing to teach people in your own space? Need to figure out where and how to start?
If your answer to any of these questions is yes, this is the article for you!
In this article, we will be discussing how you can get started with an online course business in 7 easy steps.
Further, we will also discuss courses and their market trends, a reason to build them, their components, and more. Know in detail about the existing challenges to the earning possibilities!
Let’s get started!
Fast Facts
Let’s get familiar with some fast facts about online course business!
- Investment range: $1000 – $1500
- Build-up time: 25 to 500 hours
- The trend of online course business: Rapidly growing
- Revenue potential: $50,000 – $200,000 per annum
- Profit potential: $30,000 – $100,000 per annum
Understanding Online Courses and the Market
The market size of online courses was worth more than USD 30 billion in 2022. The reason? Determination of individuals to learn and acquire new skills.
Some individuals join online classes to learn and grow professionally, whereas some take it as a hobby.
In the past couple of years, the popularity of short courses is growing tremendously. The willingness to enroll includes:
- Training to enhance skills (37%)
- Non-degree credentials (25%)
- Graduate degree (10%)
Let’s get to know about them in detail!
A. Explanation of Online Courses
An online course is an informal learning program that is organized based on different units as per the syllabus. It provides users with access to study materials.

Readers are provided with a convenient tailored learning experience.
Post the COVID-19 pandemic, online courses are on a durable rise. The reason? Its flexibility, reduced cost, course variety, personalized learning system, and more.
It can be accessed usually via an app or a website.
Different elements make online courses systematic, organized, and complete. Some of the must-have elements are:
- Functional and well-designed LMS
- Identification of all the course outcomes
- Planning of different learning methodologies
- Utilization of both synchronous and asynchronous lectures and activities
- Proper and tested delivery methods
- Online tests and quizzes to track the progress and more.
Online classes acquire simple options and flexibility, so it is preferred over traditional learning methods.
B. The Benefits of Online Learning
Online learning is simple! You just need access to the internet and a device. Then you’re ready to gain knowledge on any topic as per your flexibility.
Despite having simple nature, the benefit of online learning is uncountable. To make it easier for you, we have selected and presented the top benefits of it!
- Online learning enables learners to build courses based on the existing skill they already acquire. Similarly, he/she can also learn something entirely new.
- A lot of prestigious colleges and universities offer online degree options. So, you can gain quality of education right from where you are.
- Provides a better environment for students to continue their work while pursuing academic credentials. This way it will prevent learners from having discontinuity and gaps in jobs.
- Online learning provides a suitable environment for learners to learn. The place can range from a library to a park, whichever you prefer!
- Better opportunities are provided to students to collaborate with their classmates through meetings and virtual groups.
C. Latest Trends and Market Analysis
We’ve analyzed some of the latest trends and market analysis and presented them:
- In the year 2021, Coursera recorded 20 million new student registrations.
- The top five countries with the most online learners are the United States, India, Mexico, Brazil, and China.
- Governments of different countries are urging universities to promote Massive Open Online Courses (MOOCs) to benefit students.
- According to class central, among the top 100 online courses found across the world, technology holds the most enrolled students.
- In countries like Australia, India, and other Asian countries MOOCs are a huge part of the education system.
- MOOCs are growing in the market at a Compound Annual Growth Rate (CAGR) of 32.8% during 2021-2026.
- The global eLearning market is estimated to grow annually at a CAGR of 17.54% over the forecast period (2022-2030)
- Apollo Education Group, Blackboard, Oracle, Pearson, and Adobe leading in the eLearning market.
- North America holds a dominant position in the online learning market with the largest market share.
- In 2023, the revenue in the online education market is projected to reach US$166.60bn.
Why Build an Online Course Business?
If you’re an individual wondering: Is selling an online course profitable? Our answer is an absolute: Yes! It is profitable!
Online course business is not only a great way to earn money, but it is also a great medium to share your knowledge and passion.
The course’s idea can be as simple as cooking, gardening, or anything that you’re passionate about.
Let’s get familiar with some of the reasons to build an online class business.
1. Low Startup Capital
Newcomers hold themself back from starting a new business due to the huge capital investment. But that’s not the case with building and selling an online course.

It’s almost safe to say that online course business needs very less capital!
You need to invest in tools and sound equipment to build an online course. The expenditure on these items is comparatively less.
Initial advertising is also affordable. You can get started with social media promotion on platforms like Facebook, Instagram, TikTok, Quora, Reddit, and more.
2. Increased Income Potential
We all are aware of the changing dynamics of the online course business. It is safe to say that its income potential is likely to increase day by day. The reason? Its effectiveness!
The potential projection of the online learning market is estimated to reach $50 billion.
The successful course creators can earn around $1K to $10K per month.
The overall revenue of your online class business is determined by three essential factors:
- The size of the audience
- Overall conversion rate
- Price of your course
It is safe to say that the overall income rate of online-class businesses is increasing. It is believed to grow even more in the future.
3. Creates Reusable Assets
Online classes required maximum effort while building it. Then this asset can be used repeatedly for a more extended period.

However, the course and its needs keep on changing. To make sure that your online class business standouts, you need to update it from time to time.
Starting an online training business or online course business is like building a solid asset. It helps you generate steady income throughout the years.
4. Make a Bigger Impact
Online courses can expand their reach and scale within a certain period.
It will reach a wide amount of audience once it is popular. Plenty of learners educate themself and grow through the courses.
In the process, using LMS software will help you protect, record, and re-record videos. This will help you reach a wide audience as you can create what learners need!
To grow your outreach, use different marketing strategies, tools, and techniques.
That’s all! Using low capital and your ideas, you can make a huge impact, that too very easily.
Key Components to Start Online Course Business
Let’s dive into the list of key components to start an online course business.
1. Learning Management System (LMS)
LMS is a technology or tool that will improve your learning experience. How? LMS easily tracks the record, making the work, faster, more effective, and more productive. It also makes the process cost-effective.
LMS enables people to:
- Create, edit, and manage course content including multimedia materials like text, images, audio, and videos.
- Deliver online courses with access to materials. It provides interactive features like quizzes, assignments, and discussion forums.
- Manage users like learners, instructors, and others by assigning respective roles.
- LMS manages bulk user import, group, and password management, enables security options, and more.
Hence, LMS is a component you need while you get started on how to start an online education business.
2. Course Topic and its Target Audience
Before starting an online course business, you must select, analyze and finalize your course topic.
Try to create course topics that are trending! This way you can gain a large audience and/or learners.
For example, ChatGPT is creating a new buzz in the market. So, you can do an online course creation on the topic “How to Use ChatGPT like an expert?”
Another important point is to know your audience. After finalizing a course topic, you should know its potential audience. Then, keep yourself in their shoes.
Analyze your course from the learner’s point of view. You should know the requirements of readers and provide course content accordingly.
3. Complete and Informative Course Content
Course content is one of the most important components while starting an online course business.

Content is king! It is what appeals, engages, and increases the enrolment rate.
You should develop course content that is engaging, complete, comprehensive, and well-structured.
Having only texts can make your course content dull. So, include videos, quizzes, assignments, graphs, charts, audio, and more.
We would suggest you create a course outline or curriculum. This way all course creators, instructors, and learners will have a clear idea of what to deliver and receive.
Jot down all the problems that your course content can solve for the learners. Let learners know the overall achievable learning outcomes.
4. Pricing of the Course
Pricing strategy is a must for an online course business!
It is determined by several factors like market demand and value, business goal, target audience, perceived value, and more.
A reasonable price range appeals to more readers. Try to make your pricing as economical as possible. We recommend you sell online courses for less than $50.
The pricing of course is also determined by:
- Quality of the course content. It also depends on the knowledge, expertise, and meaningful insight.
- The length and complexity of the course. You can charge a higher price for detailed and comprehensive courses and less price for short courses.
- Whether you opt for a fixed price, tiered pricing, subscription model, or bundled packages, make sure to consider the target audience.
- Determine the pricing strategy that best aligns with your business goals and more.
5. Distribution Options and Marketing Plans
The last step is to distribute the courses and reach out to potential learners through the most used channels.

Use dedicated eLearning websites to sell your online class course. Another effective distribution option is email. You can reach out to previous and existing learners.
Online class business owners can also run different paid campaigns on Facebook, Instagram, Search Engines, and LinkedIn to reach potential customers.
Similarly, the other effective online courses marketing strategy include:
- Provide learners with different deals and exclusive discounts
- Outreaching to different educational institutions with a proper proposal
- Paid promotion on different educational websites
Types of Online Course Businesses
Let’s get familiar with some of the types of online courses businesses
1. Solo or Small Business
This kind of online course business owner focuses on a particular topic or skill. They can be speakers, authors, or an individual who acquire a particular set of skills or values.
Solo or small online course business increase their revenue by providing courses or streaming knowledge that they have.
The owner of this group doesn’t think of themself as an entrepreneur. They simply want to make money by sharing certain skills or knowledge online.
2. Traditional Training Firm
This type of online class business owner is already indulged in training and education business. They look up ideas on how to start an online training business to expand what they have been doing online.

Tradition Training Firm somehow works like a corporate learning management system.
It practices building courses using the standalone authoring package. All in all, the courses here are built with more portability.
This business often sells its online course to another business (B2B) rather than selling it to individual learners.
They focus on providing their business customers with a functional and brandable instance.
3. Trade or Professional Association
Trade or professional association aims to provide online courses with issuance and tracking of education credit.
They aim to provide detailed and useful learner transcripts. Learners can easily download the certificates they have earned with them.
This online class business can manage groups and roles in the system. Only the enrolled students can gain access to the content.
IT also provides access to widely used applications and integrations in the market.
4. Corporate Extended Enterprise
Different corporations have been providing knowledge on how to start an online training business.
They also use online course education and training for their suppliers, channel partners, and/or customers.
More revenue is earned by selling their educational products. The configuration and customization are made so that the external learners can have an appropriate learning experience.
TLDR of How to Start an Online Course Business
Do you want to know how to start an online course business? It’s simple!
Our TLDR on how to start an online course business includes 7 simple steps. Let’s check them out!
Step 1: Research the Suitable Niche
Step 2: Identify Your USP
Step 3: Create a Framework for your Online Courses
Step 4: Website Building Prerequisites
Step 5: Install and Activate a WordPress LMS Theme
Step 6: Use Masteriyo to Set Up an Online Course Business
Step 7: Determine the Pricing and Promote Online Class Business
How to Start an Online Course Business?
Starting your own online course business can be a rewarding experience. For that, you need to make sure your learner gets a comfortable and professional learning experience.
Running an online course business isn’t as difficult as most people expect it to be!
It is one of the best businesses to make passive income just from home. The online class business has sufficient market value to turn it into a primary source of income.
Without further ado, let’s dive into the detailed steps on how to start an online course business.
Step 1: Research the Suitable Niche
Niche targeting is essential if you want to run an online course business successfully.
To earn an ample amount of money, find out who will look for the specific solutions that you’ll provide.
Online course business is huge! So, you need to do some research on what niches exist out there.
Do you have any skill or knowledge that is in demand these days? Something that you can train others in? If yes, well that’s the suitable niche for you to get started with!
We suggest you ask these questions to yourself:
- What are my passions and interests?
- Who is the targeted audience for this niche?
- Will this niche be sustainable?
- How can I create more engaging and valuable content?
Want to stand out from plenty of other existing online class businesses? Then simply choose a niche that aligns with your strengths and interest.
Step 2: Identify Your USP
The unique selling proposition (USP) is something that makes your business stand out from the crowd.
USP can generally be something beneficial that you offer, that is better than other competitors. It can also be something unique and creative from your end.
Your USP must:
- Resonate with the target market and audience
- Be able to appeal to the customers
There are numerous problems in the online course business. Coming up with a solution for the target market will do you wonders!
Your USP must be powerful enough to change insight or provide solutions to overcome some of the biggest challenges.
This is the end of our second step on how to start an online course business.
Step 3: Create a Framework for your Online Courses
Decided on your niche and USP? Next, you need to create a framework for your online courses.

Framework provides a conceptual structure that will guide you while building your online courses.
If you want to know what an online course business framework looks like, here is the one!
- Identify the possible audience of your online classes
- Develop a course uniformly and create its content
- Selection of all the required infrastructure and its platform
- Pricing, revenue, and profit determination from the online classes
- Different marketing and promotion strategies
- Proper track of overall performance
- Updates as per the necessity of the learners
- Partnership, collaboration, and growth strategies
A proper framework will enable you to design and create courses along with proper solutions.
Done with your framework on how to start an online course business? Now, we suggest you choose the suitable type of online business course as per the necessity.
Step 4: Website Building Prerequisites
While building a website, you need the following:
- A domain name
A domain name can be termed as the unique address of your website.
While choosing your domain name, make sure to choose something unique and easy to spell. After you finalize a domain, check for its availability.
You can check the domain by visiting a domain registrar such as Google Domains or Namecheap
Just in case, if the domain name is already taken you must choose another name. Or else, you can also choose different suffixes such as .net or .info.
- Get hosting
Once you register your domain, you need to buy web hosting.
Web hosting service allows you to post your web page or website onto the internet.
After getting web hosting, you can publish a website and webpage. Then it will be accessible to people all over the world.
You can choose your hosting company as you want. Some of the most popular hosting options are Cloudways, Hostinger, Kinsta, GreenGeeks, and SiteGround.
- WordPress
WordPress is a popular content management system (CMS) that allows its users to create and manage websites easily.
It is free to download, install, use, and modify to match your needs. Despite being so powerful, it is suitable for both beginners and professionals.
All in all, WordPress provides its users with:
- Easy customization options
- Built-in search-engine traffic
- Proper security
WordPress can be used for the simplest websites eCommerce marketplaces and anything in between.
Step 5: Install and Activate a WordPress LMS Theme
A suitable WordPress LMS theme will make your online course business-building journey ten times easier!
If you are thinking of getting a free theme, visit the WordPress repository. Also, if you want to get a premium WordPress theme, get it from reliable websites like ThemeGrill and ThemeForest.
Are you confused about which WordPress LMS theme to choose? We suggest you use the Online Education theme.
It is one of the most popular and functional online LMS WordPress themes.
No doubt, this theme is one of the best choices for your online course business. The reason? It will enable you to create and sell online courses with ease.
Also, we would suggest trying other wonderful LMS themes like Zakra and eLearning.
Step 6: Use Masteriyo to Set Up an Online Course Business
Once you’re done installing the LMS WordPress theme, install the Masteriyo LMS plugin.
After you install and activate the plugin, configure the Masteriyo setup.

Now, you can create and add unlimited courses to your online course business.
It has a solid outline; you can just edit the content and make the course as per your need.

Masteriyo setting option will enable you to manage the page, styling, course page, single course page and learn page.
You can also make changes in payment, quizzes, emails, and advanced options.
As an online course business, you need to build and sell different courses. With the Masteriyo LMS plugin, it’s easy to do so! Simply use its inbuilt order system to sell course content.
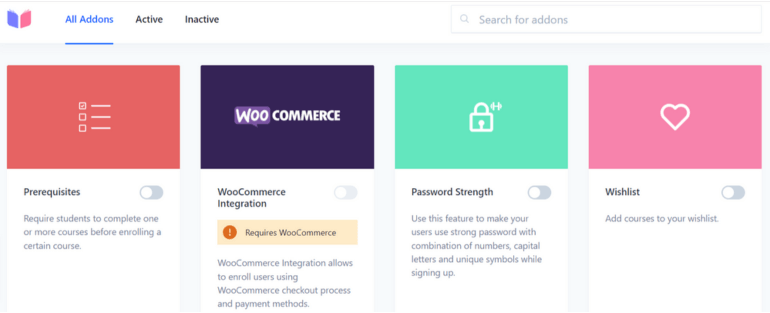
Masteriyo plugin provides various add-on options. Using those add-ons, you can add all the additional and important features to your online courses.
This is all! Here we come to the end of the sixth step of how to start an online course business
Step 7: Determine the Pricing and Promote Online Class Business
Price determination is one of the most important factors when deciding how to start an online course business. A suitable price range will help your business flourish and gain more learners.
The price of online classes can be based on different factors like the complexity of the course, instructor expertise, duration, and more.
Sometimes, the pricing can also be determined by the market demand of the course.
Moreover, price determination should be reasonable for both you and your students.
“What helps people, helps business.” Marketing or promoting will be better if you can apply diverse methods. For that, you can do multi-channel content marketing.
Similarly, others include:
- Networking with familiar-minded people
- Provide mini-courses as samples to the learners
- Create a detailed and complete course page and more
With this, here we come to the end of the steps to create an online course.
Importance of Building a Good Relationship with Buyers (How to Do it?)
Customer relationship is important in online course business to attract additional buyers and profit maximization.

Trusted readers will respect your experience and advice. Not only that, but they’ll also value your contribution and decisions.
When the relationship grows and flourishes, they’ll turn out to be your long-term customers.
Want to build a strong relationship with your buyers? If yes, we suggest you go through some of the best strategies:
- First thing first, you can create buyer’s personas to understand them better.
- Rapport with buyers through mirroring, empathy, active listening, and sharing common goals.
- Ask engaging questions, questions to find what they want. After that provide a solution and ask for their feedback. After all, it’s all about communication!
- Demonstrate your expertise! This way you can develop an understanding with your customers and assure that you can solve their problems.
- Customers perceive your brand based on moments and experiences, so engage with your audience.
- Monitor the buyer’s response and everything they do. This way, you can understand them better.
Challenges of Online Course Business
Knowing only how to create a course and sell it online is not enough. You must also know the challenges that come along the way when you launch and promote your course.
Let’s know the top three challenges of online course business.
1. Technical Issue
Most of the things in the online course business rely on technology. Launch course with the absence of several glitches, server downtime, or compatibility issues.

To make sure that learners don’t face such issues, use suitable tools, gadgets, and LMS/LMS plugins.
Sometimes, the courses are not accessible across all devices. Ensure that your online courses are compatible with different web browsers, mobile devices, and screen sizes.
How to solve it: Launch your course with technical capabilities in mind. Downsize your media and don’t use them unnecessarily. Make the content as concise as possible.
2. Lack of Proper Communication
Online learning is very convenient. But when the interaction is not fluent it might cause some sort of inconvenience.
Not only students but even remote workers claim that online classes and training make them feel isolated.
Sometimes, lack of interaction creates boredom. As a result, students might end up switching courses.
How to solve it: Provide learners with a collaborative learning environment that includes proper interactions.
3. Poor Digital Literacy
Most online course learners have poor digital literacy. They don’t have the knowledge to use the latest technology.
This might frustrate the learners and turn their easy learning experience into a nightmare.
How to solve it: Provide a short tutorial on how to use all the required tools. Make the login and navigation options simple and seamless.
How Much Can You Earn with Online Course Business?
It is challenging to provide a certain range of earnings when it comes to an online course business. The profit amount entirely depends on the amount of work and dedication you put in!
If we go through different sources, you can make anywhere between $0 to $50k+ per month.
Even the most successful creators are estimated to earn $1k to $10k per month.
Want to earn more? The most profitable courses are found to be ones related to development, business, and office.
To make it easier to understand, let’s get familiar with a simple formula to calculate online course revenue:
Revenue = Size of audience x Conversion rate x Price of your course
Andrea Bizzoto is a professional coding teacher on Udemy. He teaches coding through Udemy and various teachable websites.

As per his income report, he made around $3,580 per month. In aggregate, he was able to make $43,000 in the year 2020.
Frequently Asked Questions
Yes, you can easily add lessons and quizzes to your course using its course builder. Moreover, managing them is easy with its drag-and-drop feature.
The selection of online courses for your business depends on various factors like your interest, current market trend and more.
Learners need a web browser, mobile or tablet device, and a reliable internet connection to take online classes.
It is estimated that an online course owner earns $1k to $10k per month. Moreover, it is just an estimation, you can earn as per the good work you put in.
The key components to starting an online course business are LMS, course topic, course content, pricing, and marketing strategy for the online course business.
Conclusion
Starting an online course requires a lot of planning and execution. But that is it! After that, you can get started with a low investment and make a profit throughout.
There are plenty of online courses being built daily. If you want your course to stand out make sure that it’s relevant, updated, and includes the best courses and resources.
Managing online course business becomes ten times easier with the right resources.
In this article, we suggested you use the Masteriyo LMS plugin. The reason? Its revolutionary resources enable you to teach anything, anytime, and anywhere.
Are you confused about the selective way to choose the right LMS plugin for your business? No worries, we’ve got your back with a comprehensive guide.
We hope our article helped you to get familiar with how to start an online course business
We wish you all the best for your online course business!


![Zakra 3.0 | Zakra Pro 2.0 Release [Major Updates!]](https://i.ytimg.com/vi/g3rifl7kWvg/maxresdefault.jpg)